This article describes how to get a custom or third party JavaScript widget working on your Blogger blog. The problem is Blogger was never intended for much more than simple HTML posts and because of this the inclusion of JavaScript or CSS files is not straightforward, but there are workarounds. To demonstrate one of these workarounds, we are going to use Image Slider Maker—a tool for generating content sliders—to provide our test case widget HTML, JavaScript and CSS. Because Blogger was not designed for hosting arbitrary files, we will host our JavaScript and CSS on Google Drive.
Let's get started.
PART 1: Getting the code
-
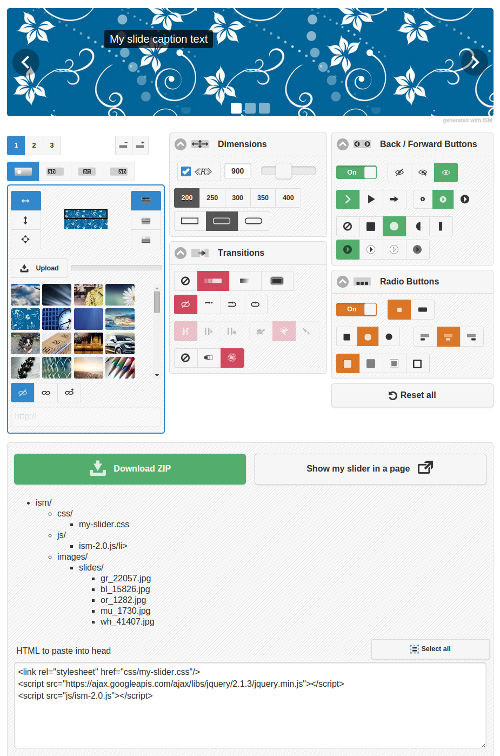
First, go to imageslidermaker.com/v2
The tool provides controls for editing your slider's design, but in this case we'll stick with the default.
-
Scroll down the page to the large green Download Zip button and click it.
The download options panel will appear. You can keep the Email the zip to me checkbox unchecked.
-
Now click on the grey Download Now button.
Your download will begin.
-
After the download is complete open the folder where imageslidermaker.zip was saved, such as your "Downloads" folder.
- If using Windows 7 or similar, right-click on the file and choose Extract All... from the context menu.
How you extract the zip will depend on your operating system and which applications you have installed.
At this point it is a good idea to test that the slider widget works on your local computer.
-
After extracting the zip, navigate into the imageslidermaker folder and open example.html in your web browser.
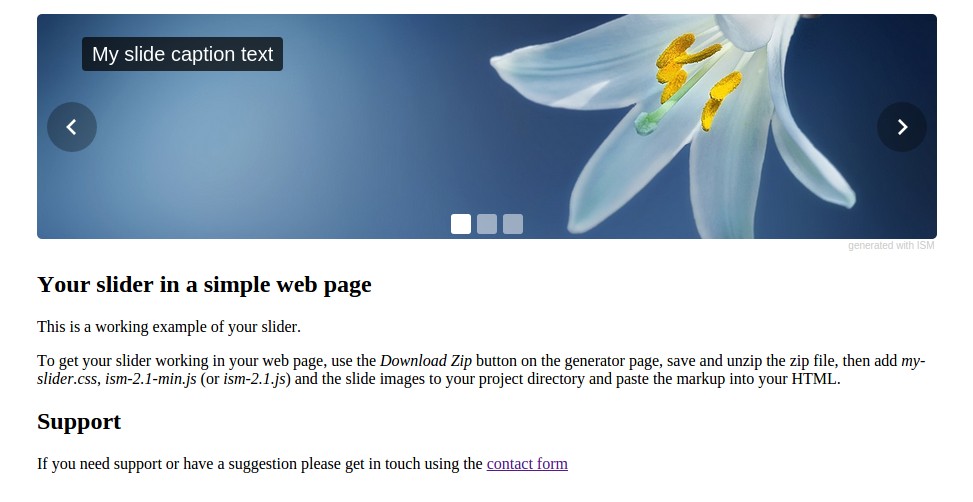
You should now see a working image slider, which you can interact with.
PART 2: Create a simple Blogger post and include the third-party HTML
It is assumed you already have a Blogger account and have created at least one blog.
-
Create a new post and enter a title, such as "JavaScript Widget Test" in the top most text box.
-
Click on the image insert tool in the toolbar and under the Upload tab, click the "Choose files" button.
-
Navigate to the imageslidermaker/ folder, then into ism/, then image/, and finally into the slides/ folder.
-
Select and upload all three image files.
-
Click the "Add selected" button at the lower-left corner of the Select a file panel.
If asked to choose a layout, select None.
-
Make sure the "HTML" rather than "Compose" toggle button is selected.
In the Editor, you should see the HTML markup for the images you uploaded.
-
Navigate into imageslidermaker/ and open example.html in Notepad or your favorite editor application.
If you have trouble opening example.html, you could open README.txt instead.
-
Select and copy the slider's HTML.
It should looks like this:
<div class="slider" id="my-slider"> <ul> <li> <img src="ism/image/slides/flower-729514_1280.jpg" /> <div class="ism-caption ism-caption-0">My slide caption text</div> </li> <li> <img src="ism/image/slides/beautiful-701678_1280.jpg" /> <div class="ism-caption ism-caption-0">My slide caption text</div> </li> <li> <img src="ism/image/slides/summer-192179_1280.jpg" /> <div class="ism-caption ism-caption-0">My slide caption text</div> </li> </ul> </div> -
In Blogger, focus your cursor below the existing markup and paste in the HTML.
If you preview the blog post at this point the slider will not be rendered properly because the CSS and JavaScript have not yet been included.
-
Now copy and paste each of the three img src attributes from the generated HTML into the slider HTML that you pasted in, so that your slider markup looks something like this:
<div class="slider" id="my-slider"> <ul> <li> <img src="http://3.bp.blogspot.com/-XJHvzkp6Czs/Vh5y70inIxI/AAAAAAAAAYY/YS-k5iujTvk/s320/beautiful-701678_1280.jpg" /> <div class="ism-caption ism-caption-0">My slide caption text</div> </li> <li> <img src="http://2.bp.blogspot.com/-osMPF_RDK24/Vn5y579M6gI/AAAAAAAAAYQ/LdLZ3-IwPzU/s320/flower-729514_1280.jpg" /> <div class="ism-caption ism-caption-0">My slide caption text</div> </li> <li> <img src="http://1.bp.blogspot.com/-Cl421heEeD8/Vh5y89mxfTI/AAAAAAAAAYU/8MXkej-kV-M/s320/summer-192179_1280.jpg" /> <div class="ism-caption ism-caption-0">My slide caption text</div> </li> </ul> </div> -
Now that you have copied the image URLs into place, you no longer need the images, so you can delete the HTML above the slider's markup.
-
Save the blog post.
PART 3: Upload JavaScript and CSS files to Google Drive and obtain their URLs for public use
-
Open a new browser tab, go to Google Drive and sign in if you need to.
-
Click on the New button and select File upload from the drop-down menu.
-
Navigate to imageslidermaker/ism/css/ in your computer's file system, select my-slider.css and upload it.
We'll now repeat for the JavaScript file.
-
Click on the New button again and select File upload.
-
Navigate to imageslidermaker/ism/js/ in your computer's file system, select ism-2.2.min.js and upload it.
-
Locate the two files in your Google Drive. Either click on My Drive or Recent in the left-hand menu.
Note, there can sometimes be a short delay between uploading a file and it appearing in the file list.
-
Right-click on my-slider.css and select Share from the context menu.
The "Share with others" options popup will appear.
-
Make sure the "Anyone with the link can view" option is selected.
-
Click "Get shareable link", located towards the top right of the panel.
The URL of the file should now be copied to your clipboard.
-
Either paste the copied URL into a text file or make a note of it, because we are going to need it later.
-
Repeat steps 7, 8, 9 and 10 for ism-2.2.min.js.
PART 4: Modify the Blogger template and include the external JavaScript and CSS files
-
Go back to Blogger, make sure you're signed in and click through to your blog's Overview page.
-
Select "Template" from the left-hand menu.
You may need to select a template before continuing.
There should be a template preview near the top of the page.
-
Click the Edit HTML button, which will open a HTML editor for you edit your blog's template.
-
Enter the following two lines above the closing </head:> tag:
<link href="https://googledrive.com/host/XXXXXXXXXXXXXXXXXXXXXXXXXXXX" rel="stylesheet" /> <script src="https://googledrive.com/host/YYYYYYYYYYYYYYYYYYYYYYYYYYYY" type="text/javascript"></script> -
For the link tag, which we use to include the CSS file, replace the 28-character identifier with the one you copied from Google Drive.
For example:
https://drive.google.com/file/d/0B0w5YBrrG3z0cU97T0x4AEctME0/view?usp=sharing
In this case, you would replace XXXXXXXXXXXXXXXXXXXXXXXXXXXX with 0B0w5YBrrG3z0cU97T0x4AEctME0.
-
Similarly, for the script tag, which includes the JavaScript file, replace the 28-character identifier with the one you copied from the Google Drive.
-
Save the template.
Now if you view the blog post, the JavaScript and CSS should both be included and the slider should work.
Share